Milk Cake of Rosa

Milk Cake of Rosa


Introduction

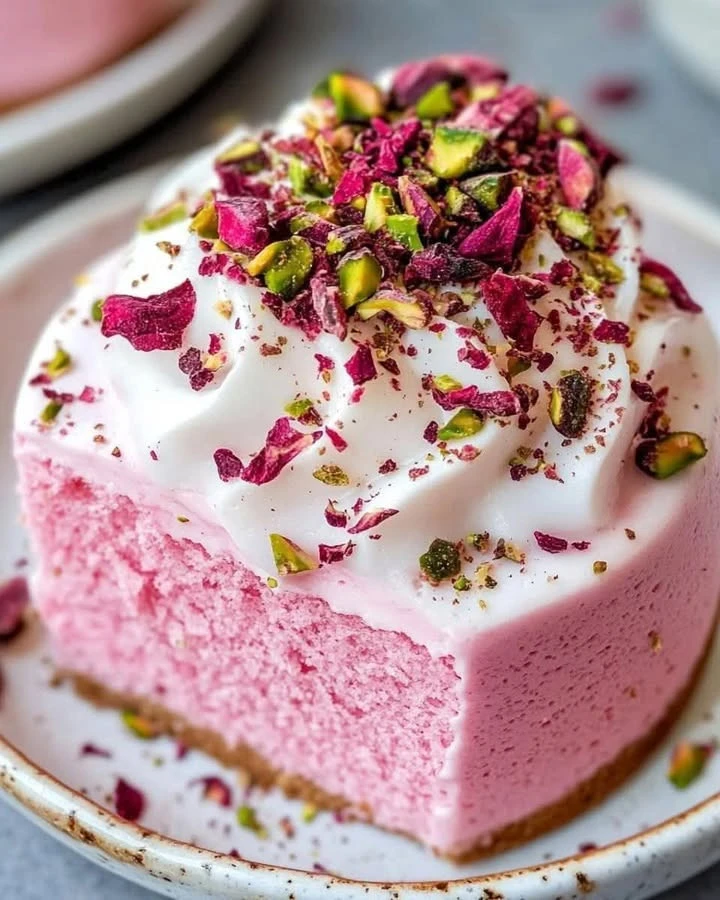
Milk Cake of Rosa is a lovely dessert that brings joy to every gathering! With a soft texture and sweet rose flavor, it’s a treat for everyone. Whether it’s a special occasion or a cozy family dinner, this cake can shine on any table.

Why Make This Recipe

You should definitely try making the Milk Cake of Rosa because it’s simple, quick, and delicious! It’s perfect for weekends when you want to bake something special. Plus, your family will love the flavors and the beautiful presentation. Once you try it, it might just become your new favorite!

How to Make Milk Cake of Rosa

Making this cake is easy! Just follow these steps:

Ingredients:

  • 1 1/2 cups all-purpose flour
  • 1 teaspoon baking powder
  • 1/2 teaspoon baking soda
  • 1/4 teaspoon salt
  • 1/2 cup unsalted butter, melted
  • 3/4 cup granulated sugar
  • 1/2 cup yogurt
  • 1/2 cup milk
  • 1 tablespoon rose syrup (Rooh Afza)
  • 1 teaspoon vanilla extract
  • 1/2 cup condensed milk
  • 1/2 cup whole milk
  • 1/4 cup heavy cream
  • 1 tablespoon rose syrup
  • 1 cup whipped cream
  • 2 tablespoons chopped pistachios
  • 1 tablespoon dried rose petals

Directions:

  1. Preheat your oven to 350°F (175°C) and grease a cake pan.
  2. In one bowl, mix together the flour, baking powder, baking soda, and salt. In another bowl, beat the melted butter, sugar, yogurt, milk, rose syrup, and vanilla until smooth. Now, combine the wet and dry ingredients.
  3. Pour the batter into the prepared pan and bake for 30-35 minutes. Let it cool completely afterward.
  4. While the cake is cooling, prepare the milk mixture. Combine the condensed milk, whole milk, heavy cream, and an additional tablespoon of rose syrup in a bowl.
  5. Once the cake has cooled, poke holes in the top and pour the milk mixture evenly over it. Chill the cake in the refrigerator for 1 hour.
  6. Finally, cover the cake with whipped cream, sprinkle with chopped pistachios, and garnish with dried rose petals. Slice it up and enjoy!

How to Serve Milk Cake of Rosa

Serve this beautiful cake chilled. It’s perfect as a dessert after dinner or as a sweet treat during tea time. You can slice it and place it on plates for everyone to enjoy.

How to Store Milk Cake of Rosa

If you have leftovers, store the cake in an airtight container in the refrigerator. It will stay fresh for about 3 to 4 days. Make sure to keep the whipped cream topping separate if possible, so it stays fluffy!

Tips to Make Milk Cake of Rosa

  • Make sure your ingredients are at room temperature for the best results.
  • You can adjust the amount of rose syrup according to your taste.
  • Always check the cake with a toothpick to ensure it’s cooked through; it should come out clean.

Variation

You can try adding some chopped nuts, like almonds or walnuts, to the cake batter for an extra crunch. You can also swap the rose syrup for other flavors like saffron or cardamom for a different twist!

FAQs

  1. Can I use low-fat milk for this cake?
    Yes, you can use low-fat milk, but the cake might be slightly less rich.

  2. Can I make this cake ahead of time?
    Absolutely! This cake can be made a day in advance. Just keep it in the fridge and add the toppings before serving.

  3. What if I don’t have rose syrup?
    If you can’t find rose syrup, you can use any other flavored syrup, or simply skip it for a plain milk cake.

Chocolate Cake

Chocolate Cake


Introduction

Who doesn’t love a rich and moist chocolate cake? It’s a classic dessert that brings smiles to faces and warmth to hearts. Whether you’re celebrating a birthday, a special occasion, or just need something sweet, this chocolate cake is the perfect choice.

Why Make This Recipe

This chocolate cake is not just delicious; it’s also super easy to make! With simple ingredients and straightforward steps, you can bake a cake that tastes like a dream. It’s perfect for family gatherings, weekend celebrations, or even a Tuesday treat! Plus, it’s sure to impress everyone who tries it.

How to Make Chocolate Cake

Ingredients:

  • 1 ¾ cups all-purpose flour
  • 2 cups sugar
  • ¾ cup cocoa powder
  • 1 ½ teaspoons baking powder
  • 1 ½ teaspoons baking soda
  • 1 teaspoon salt
  • 2 large eggs
  • 1 cup milk
  • ½ cup vegetable oil
  • 2 teaspoons vanilla extract
  • 1 cup boiling water

Directions:

  1. Preheat the oven to 350°F (175°C). Grease and flour two 9-inch round cake pans.
  2. In a large bowl, mix the flour, sugar, cocoa powder, baking powder, baking soda, and salt.
  3. Add the eggs, milk, oil, and vanilla. Beat on medium speed for 2 minutes until well mixed.
  4. Stir in the boiling water. Mix well and divide the batter between the prepared pans.
  5. Bake for 30-35 minutes or until a toothpick inserted in the center comes out clean.
  6. Let the cakes cool in the pans for 10 minutes, then transfer them to wire racks to cool completely.

How to Serve Chocolate Cake

Serve the chocolate cake with a dollop of whipped cream or a scoop of vanilla ice cream on the side. You can also sprinkle some powdered sugar on top for a pretty finish.

How to Store Chocolate Cake

Keep the chocolate cake in an airtight container at room temperature for up to 3 days. If you want it to last longer, you can refrigerate it for up to a week, or freeze it for up to 3 months. Just wrap it well!

Tips to Make Chocolate Cake

  • Make sure all your ingredients are at room temperature before mixing. This helps the cake rise better.
  • Don’t skip the boiling water! It helps to create a moist cake.
  • Use a toothpick to check if it’s done; it should come out clean when inserted in the center.

Variation

You can add chocolate chips or nuts to the batter for extra flavor. You can also layer it with your favorite frosting, like cream cheese or chocolate ganache!

FAQs

  1. Can I use almond flour instead of all-purpose flour?

    • Yes, but make sure to adjust the measurement as almond flour has different properties.
  2. Can I make this cake in a single pan?

    • Absolutely! Just bake it for a longer time, about 40-45 minutes, depending on your oven.
  3. How can I make a vegan version of this cake?

    • You can replace eggs with flaxseed meal and use plant-based milk and oil instead of dairy.

Fresh Strawberries

Fresh Strawberries


Fresh strawberries are a delicious and healthy treat. They are sweet, juicy, and full of flavor. You can enjoy them on their own, in desserts, or in drinks. This article will guide you on how to make the most of fresh strawberries.

Why Make This Recipe

Making a recipe with fresh strawberries is a great way to enjoy their natural sweetness. They are packed with vitamins and nutrients. Plus, they’re easy to prepare and can be used in many dishes. Whether you want a snack or a side dish, fresh strawberries are a perfect choice.

How to Make Fresh Strawberries

Ingredients:

  • 1 pound of fresh strawberries
  • 2 tablespoons of sugar (optional)
  • 1 tablespoon of lemon juice (optional)

Directions:

  1. Wash the strawberries under cool water.
  2. Remove the green tops by cutting them off.
  3. If desired, slice the strawberries into halves or quarters.
  4. If you want to sweeten the strawberries, mix them with sugar and lemon juice in a bowl.
  5. Let them sit for 10-15 minutes to release their juices.

How to Serve Fresh Strawberries

You can serve fresh strawberries in many ways. They are great on their own or with whipped cream. You can also add them to yogurt, oatmeal, salads, or smoothies for extra flavor.

How to Store Fresh Strawberries

To keep fresh strawberries, store them in the refrigerator. Place them in a breathable container to avoid moisture build-up, which can cause them to spoil. Do not wash them until you are ready to eat or use them.

Tips to Make Fresh Strawberries

  • Choose ripe strawberries with bright red color.
  • Try using different toppings like chocolate or nuts for variety.
  • Add fresh basil or mint for a unique flavor.

Variation

You can make a fresh strawberry sauce by blending the strawberries with sugar and a little water. This sauce can be used over ice cream, pancakes, or waffles.

FAQs

Q: Can I freeze fresh strawberries?
A: Yes, you can freeze them. Wash and dry them, then spread them on a baking sheet to freeze before transferring them to a freezer bag.

Q: How long do fresh strawberries last?
A: Fresh strawberries usually last about 3-7 days in the refrigerator if stored properly.

Q: Can I use frozen strawberries instead of fresh?
A: Yes, but frozen strawberries will be softer when thawed. They’re great for smoothies or sauces.

Delicious

Delicious


Have you ever wanted to make something that is not only tasty but also easy to prepare? This recipe for Delicious is just what you need! It combines simple ingredients to create a mouth-watering dish that everyone will love.

Why Make This Recipe

Making this recipe is a great way to impress your family and friends. It is quick to prepare, and the flavors are sure to please any crowd. Plus, it’s versatile, so you can customize it to fit your taste.

How to Make Delicious

Ingredients:

  • [Insert ingredient list here]

Directions:

  1. Start by preparing all your ingredients.
  2. Follow the steps carefully, making sure not to skip any.
  3. Cook until everything is perfectly combined and heated through.
  4. Serve hot and enjoy!

How to Serve Delicious

You can serve Delicious warm on a nice plate. It goes well with a side salad, rice, or bread. Don’t forget to add your favorite sauce or garnish!

How to Store Delicious

Store any leftovers in an airtight container in the fridge. It will stay fresh for up to three days. If you want to keep it longer, consider freezing it.

Tips to Make Delicious

  • Always taste as you go to adjust the flavors.
  • Use fresh ingredients for the best results.
  • Don’t rush the cooking process; let the flavors blend together.

Variation

You can easily change this recipe by adding different spices or by using other proteins or vegetables. Get creative!

FAQs

1. Can I make this recipe ahead of time?
Yes, you can prepare it a day in advance and reheat it before serving.

2. Is this recipe suitable for freezing?
Yes, it freezes well. Just make sure to store it in a freezer-safe container.

3. Can I use different ingredients?
Absolutely! Feel free to swap out ingredients to suit your taste or dietary needs.


Delicious Marble Cake

Delicious Marble Cake


Introduction

Marble cake is a classic treat that combines the rich flavors of chocolate and vanilla. It’s soft, sweet, and oh-so-delicious! Perfect for family gatherings, birthdays, or just a cozy weekend treat.

Why Make This Recipe

This marble cake is not just easy to make; it’s also a crowd-pleaser! With its beautiful swirls of chocolate and vanilla, it looks just as good as it tastes. Making this cake brings back fond memories of baking with family. Plus, your kitchen will smell amazing!

How to Make Delicious Marble Cake

Ingredients:

  • 1 cup unsalted butter (softened)
  • 1 3/4 cups granulated sugar
  • 4 large eggs
  • 1 cup whole milk
  • 2 1/2 cups all-purpose flour
  • 2 1/2 tsp baking powder
  • 1/2 tsp salt
  • 1/4 cup cocoa powder
  • 1 tsp vanilla extract

Directions:

  1. Beat the softened butter and sugar together until fluffy.
  2. Add the eggs one by one, mixing well after each addition.
  3. In another bowl, mix the flour, baking powder, and salt together.
  4. Alternate adding the dry mix and milk to the batter, stirring as you go.
  5. Take 1/3 of the batter and mix in the cocoa powder.
  6. In a greased cake pan, pour in the vanilla batter first, then add the chocolate batter.
  7. Use a knife to swirl the two batters for a marbled look.
  8. Bake at 350°F (175°C) for 50-60 minutes.
  9. Let it cool before cutting and savoring.

How to Serve Delicious Marble Cake

This marble cake is delightful on its own, but you can also serve it with whipped cream or a scoop of vanilla ice cream. It’s great for birthdays, tea time, or just as a snack with coffee!

How to Store Delicious Marble Cake

To keep your marble cake fresh, store it in an airtight container at room temperature for up to 3 days. If you want it to last longer, you can refrigerate it for about a week.

Tips to Make Delicious Marble Cake

  • Make sure your butter is softened for a smooth batter.
  • Don’t overmix your batter; just stir until combined.
  • Allow the cake to cool completely before slicing for cleaner cuts.

Variation

You can add nuts or chocolate chips to the batter for extra flavor. If you’re a fan of lemon, try adding lemon zest for a refreshing touch!

FAQs

1. Can I use salted butter instead of unsalted butter?
Yes, but if you use salted butter, skip the added salt in the recipe.

2. What if I don’t have cocoa powder?
You can substitute cocoa powder with melted chocolate, but adjust the amount.

3. Can I freeze the marble cake?
Absolutely! Wrap it tightly in plastic wrap and then in aluminum foil to freeze for up to 3 months. Thaw before serving.


Triple Chocolate Mousse Cake

Triple Chocolate Mousse Cake


Introduction

If you love chocolate, you’re in for a real treat! This Triple Chocolate Mousse Cake is layers of rich, creamy goodness that will make your heart sing. Whether it’s for a special occasion or just a cozy night in, this cake is sure to impress everyone.

Why Make This Recipe

This cake is not just any dessert; it’s a chocolate lover’s dream! With its velvety mousse layers and crunchy Oreo crust, it’s perfect for celebrations or a weekend indulgence. Plus, it’s easier to make than you might think, and your family will be begging for seconds!

How to Make Triple Chocolate Mousse Cake

Ingredients

  • 2 cups finely crushed Oreo cookies
  • 1/4 cup unsalted butter, melted
  • 1 cup all-purpose flour
  • 1/2 cup cocoa powder
  • 1 teaspoon baking powder
  • 1/2 teaspoon baking soda
  • 1/4 teaspoon salt
  • 1/2 cup granulated sugar
  • 1/2 cup packed brown sugar
  • 2 large eggs
  • 1/2 cup milk
  • 1/4 cup vegetable oil
  • 1 teaspoon vanilla extract
  • 1/2 cup hot coffee
  • 1 cup semi-sweet chocolate, melted
  • 1 cup milk chocolate, melted
  • 2 cups heavy cream, cold
  • 1/4 cup powdered sugar (optional)
  • 1 cup semi-sweet chocolate chips
  • 1/2 cup heavy cream

Directions

  1. Preheat your oven to 350°F (175°C) and grease an 8-inch springform pan.
  2. In a bowl, mix the crushed Oreo cookies with melted butter and press it into the bottom of the pan to form the crust. Bake for 10 minutes and then let it cool.
  3. In another bowl, stir together the flour, cocoa powder, baking powder, baking soda, and salt.
  4. In a separate bowl, whisk the granulated sugar, brown sugar, eggs, milk, oil, and vanilla until it’s smooth.
  5. Gradually add the dry ingredients to the wet ingredients. Then, mix in the hot coffee.
  6. Pour this cake batter over your cooled crust and bake for 25-30 minutes. Let it cool completely after baking.
  7. Whip the cold heavy cream until soft peaks form and divide it into two bowls.
  8. Fold in the melted semi-sweet chocolate into one bowl to create a mousse, then do the same with the melted milk chocolate in the other bowl.
  9. Spread the semi-sweet chocolate mousse over the cooled cake layer and put it in the fridge for 30 minutes.
  10. Top with the milk chocolate mousse and refrigerate for 2 hours.
  11. For the ganache, heat the heavy cream until it’s steaming and pour it over the chocolate chips. Let it sit for 5 minutes, then stir until smooth.
  12. Pour the ganache over the mousse layers and refrigerate for another hour before serving.

How to Serve Triple Chocolate Mousse Cake

Serve this cake chilled from the fridge. It’s wonderful on its own, but you can add whipped cream or fresh berries on top for an extra treat.

How to Store Triple Chocolate Mousse Cake

Keep any leftover cake in the refrigerator, covered tightly. It should stay fresh for about 3-4 days.

Tips to Make Triple Chocolate Mousse Cake

  • Make sure the heavy cream is very cold for the best whipping results.
  • Let the cake cool completely before adding the mousse layers to prevent melting.
  • You can use any combination of chocolates you like!

Variation

For a fun twist, try adding some chopped nuts or chocolate shavings between the layers. You can also substitute the coffee with milk if you want a milder flavor.

FAQs

1. Can I make this cake ahead of time?
Yes! This cake is perfect to make a day ahead. Just keep it in the fridge until it’s time to serve.

2. Can I use a different type of cookie for the crust?
Absolutely! You can use chocolate graham crackers or any similar cookie you like.

3. What can I do if I don’t have an 8-inch springform pan?
You can use a regular cake pan, but it may be a little harder to remove the cake. Just be careful while serving!

Enjoy making and sharing this delightful Triple Chocolate Mousse Cake with your family and friends!

Heart-shaped Macarons for Valentine’s Day

Heart-shaped Macarons for Valentine’s Day


Introduction

Valentine’s Day is the perfect occasion to surprise your loved ones with something sweet and special. These heart-shaped macarons are not only delightful to look at but also a treat for the taste buds. Making macarons might seem tricky, but with this simple recipe, you can create these charming desserts right at home!

Why Make This Recipe

Macarons are a beloved treat that many people adore. Making heart-shaped macarons for Valentine’s Day adds a personal touch to your gift. You can try them with family or friends, and the best part is that they are gluten-free! Plus, they are a great way to show someone you care because you took the time to make them a special treat.

How to Make Heart-shaped Macarons

Making heart-shaped macarons is easy and fun! You will be amazed at how simple it is to create these delicious little goodies.

Ingredients

  • 1 3/4 cups (175g) powdered sugar
  • 1 cup (120g) almond flour (finely ground)
  • 3 egg whites, at room temperature
  • 1/4 cup (50g) granulated sugar
  • 1/4 teaspoon cream of tartar (optional)
  • 1/2 teaspoon vanilla extract
  • Pink gel food coloring
  • 1/2 cup unsalted butter, at room temperature
  • 1 1/2 cups powdered sugar (for the buttercream filling)
  • 1 teaspoon vanilla extract (for the buttercream filling)
  • 1-2 tablespoons heavy cream or milk (adjust for consistency)

Directions

  1. Prepare the Macaron Shells: Preheat your oven to 300°F (150°C). Line baking sheets with parchment paper or silicone mats. In a food processor, mix the powdered sugar and almond flour until well combined. Sift this mixture into a large bowl and set aside any big bits.

  2. Make the Meringue: In a clean bowl, beat the egg whites on medium speed until foamy. Add the cream of tartar (if using) and sprinkle in the granulated sugar gradually while whisking. Turn the speed to high and whip until you have stiff, glossy peaks. Add a few drops of pink gel food coloring and mix until it’s well blended.

  3. Combine the Mixtures: Gently fold the almond flour mixture into the meringue in three parts. Use a spatula to fold until the batter flows like melted lava and forms a ribbon that dissolves in about 10 seconds. Be careful not to overmix!

  4. Shape the Hearts: Transfer the batter to a piping bag with a round tip. Pipe small heart shapes onto the prepared baking sheets. For hearts, create two small connected dots at one end. Tap the baking sheets gently on the counter a few times to release air bubbles. Use a toothpick to pop any visible bubbles. Let them sit at room temperature for 30-60 minutes until they dry and aren’t sticky to the touch.

  5. Bake: Bake one tray at a time for 14-16 minutes. The macarons are done when they develop "feet" and don’t move when touched lightly. Allow them to cool completely on the sheets before carefully removing them.

  6. Prepare the Buttercream: In a bowl, beat the softened butter until smooth. Gradually add the powdered sugar until well combined. Stir in the vanilla extract and heavy cream, adding one tablespoon at a time until the frosting is spreadable.

  7. Assemble the Macarons: Pair macaron shells by size. Spread a small amount of buttercream on the flat side of one shell and sandwich it with another. Press gently to seal.

How to Serve Heart-shaped Macarons

Serve these lovely macarons on a pretty plate or in a decorative box. They make a gorgeous gift for Valentine’s Day! You can enjoy them with a cup of tea or coffee for a sweet afternoon treat.

How to Store Heart-shaped Macarons

To keep your macarons fresh, store them in an airtight container in the fridge. They can last for about 5 days. For the best texture, let them come to room temperature before serving.

Tips to Make Heart-shaped Macarons

  • Make sure your egg whites are at room temperature for the best meringue.
  • Don’t skip the resting step; it helps create that perfect shell.
  • Use a kitchen scale for precise measurements for best results.

Variation

You can experiment with different flavors for the buttercream filling, such as raspberry or chocolate. Just add a little bit of fruit puree or cocoa powder to the buttercream recipe!

FAQs

  1. Why did my macarons crack?
    Cracking is usually a sign of overmixing or baking at too high of a temperature. Make sure to follow the steps carefully!

  2. Can I use almond flour?
    Yes, almond flour is essential for making macarons. It gives them their unique texture and flavor.

  3. What if my macarons are too chewy?
    They might need to bake a little longer. Make sure your oven temperature is correct, and adjust the baking time if necessary.


Now you’re ready to impress your loved ones with these adorable heart-shaped macarons! Happy baking!

Heavenly White Chocolate Raspberry Cake

Heavenly White Chocolate Raspberry Cake


Introduction

Are you ready to treat yourself to something truly special? This Heavenly White Chocolate Raspberry Cake is just what you need! With its rich white chocolate flavor and fresh raspberries, every bite is like a little slice of paradise. It’s easy to make, perfect for any occasion, and sure to impress your family and friends.

Why Make This Recipe

Why should you make this cake? First, it’s delicious! The combination of sweet white chocolate and tangy raspberries makes it a delightful treat. Second, it’s simple enough to whip up for a weekend dessert or a special family gathering. Plus, your loved ones won’t be able to resist asking for seconds!

How to Make Heavenly White Chocolate Raspberry Cake

Let’s get started on this tasty cake!

Ingredients:

  • 1 1/2 cups all-purpose flour
  • 1 1/2 teaspoons baking powder
  • 1/4 teaspoon salt
  • 1/2 cup unsalted butter, softened
  • 1 cup granulated sugar
  • 2 large eggs
  • 1 teaspoon vanilla extract
  • 1/2 cup milk
  • 1 cup fresh raspberries
  • 1 cup melted white chocolate (for drizzling and cake)

Directions:

  1. Preheat your oven to 350°F (175°C). Grease and flour a 9×5-inch loaf pan.
  2. In a medium bowl, whisk together the flour, baking powder, and salt.
  3. In a large bowl, beat the softened butter and sugar until it’s light and fluffy.
  4. Add the eggs one at a time, mixing well after each addition. Stir in the vanilla extract.
  5. Gradually add the flour mixture to the butter mixture, alternating with the milk. Start and end with the flour mixture, mixing until combined.
  6. Gently fold in the fresh raspberries and half of the melted white chocolate.
  7. Pour the batter into the prepared pan and smooth the top.
  8. Bake for 60-70 minutes, or until a toothpick inserted into the center comes out clean.
  9. Allow the cake to cool in the pan for 10 minutes, then remove it and cool completely on a wire rack.
  10. Once cooled, drizzle the remaining melted white chocolate on top and garnish with extra fresh raspberries if desired.

How to Serve Heavenly White Chocolate Raspberry Cake

Serve this lovely cake with a cup of coffee or tea for a delightful treat. You can also add a scoop of vanilla ice cream on the side for extra sweetness!

How to Store Heavenly White Chocolate Raspberry Cake

To store your cake, keep it in an airtight container at room temperature. It will stay fresh for up to three days. You can also refrigerate it for a longer shelf life, up to a week, but make sure to let it come to room temperature before serving.

Tips to Make Heavenly White Chocolate Raspberry Cake

  • Make sure your butter is softened for easier mixing.
  • Be gentle when folding in the raspberries to keep them whole.
  • If you want a richer chocolate flavor, add more melted white chocolate on top!

Variations

Feel free to experiment! You can swap the raspberries for strawberries or blueberries. You can also use dark or milk chocolate instead of white for a different taste.

FAQs

Can I use frozen raspberries instead of fresh?
Yes, you can! Just make sure to thaw and drain them before adding to the batter.

Why is my cake dense?
Make sure you are measuring your flour correctly, and don’t overmix the batter.

How can I tell when the cake is done?
Insert a toothpick into the center; if it comes out clean, the cake is ready!


Chocolate Fudge Layer Cake

Chocolate Fudge Layer Cake is a rich, decadent dessert that will make any occasion special. With its gooey chocolate goodness and smooth ganache topping, this cake is a crowd-pleaser. Whether you’re celebrating a birthday or just want to treat yourself, this cake is sure to bring smiles to everyone’s faces.

Why Make This Recipe

You should make this Chocolate Fudge Layer Cake because it’s easy and delicious! It’s perfect for family gatherings, special occasions, or just a cozy weekend at home. Plus, it’s fun to bake! You’ll love the smell of chocolate wafting through your kitchen. This cake is a fantastic way to show your loved ones you care, and trust me, they will love every bite.

How to Make Chocolate Fudge Layer Cake

Ingredients:

  • 1 cup unsalted butter
  • 2 cups granulated sugar
  • 4 large eggs
  • 1 teaspoon vanilla extract
  • 1 cup all-purpose flour
  • 1 cup unsweetened cocoa powder
  • 1/2 teaspoon salt
  • 1 teaspoon baking powder
  • 1 cup chocolate chips (semi-sweet or bittersweet)
  • 1 cup heavy cream
  • 8 oz semi-sweet chocolate, chopped

Directions:

1️⃣ Make the Brownie Cake: Preheat your oven to 350°F (175°C) and grease a 9×13 inch baking dish. In a medium saucepan, melt the butter over medium heat. Once melted, remove it from the heat and stir in the sugar until well combined. Add the eggs one at a time, mixing well after each addition. Then, stir in the vanilla extract. In a separate bowl, whisk together the flour, cocoa powder, salt, and baking powder. Gradually combine the dry ingredients with the wet ingredients until just mixed. Fold in the chocolate chips. Pour the batter into the prepared baking dish and bake for 25-30 minutes, or until a toothpick comes out with a few moist crumbs. Allow it to cool completely.

2️⃣ Make the Ganache: In a small saucepan, heat the cream over medium heat until it begins to simmer (but don’t let it boil!). Pour the hot cream over the chopped chocolate in a heatproof bowl. Let it sit for 2-3 minutes, then stir until smooth and glossy.

3️⃣ Assemble the Cake: Pour the ganache over the cooled brownie cake, spreading it evenly. Let the ganache sit at room temperature for a softer texture, or refrigerate it for a firmer texture.

4️⃣ Serve: Cut into squares or rectangles. For a fancy touch, top each piece with whipped cream, fresh fruit, or a dusting of powdered sugar. Enjoy!

How to Serve Chocolate Fudge Layer Cake

Serve this cake warm or at room temperature. You can cut it into squares or rectangles. It’s great on its own, or you can add a dollop of whipped cream or some fresh berries on top to make it even better.

How to Store Chocolate Fudge Layer Cake

Store any leftover cake in an airtight container at room temperature for about 2-3 days. If you want to keep it longer, place it in the refrigerator, where it can last for up to a week. Make sure to cover it well to keep it fresh!

Tips to Make Chocolate Fudge Layer Cake

  • Make sure your ingredients are at room temperature for the best results.
  • Don’t overmix the batter. Mix until just combined.
  • If you want extra chocolaty goodness, add more chocolate chips!

Variation

You can add nuts like walnuts or pecans to the batter for an added crunch. You can also try using different types of chocolate for a unique flavor!

FAQs

  1. Can I use dark chocolate instead of semi-sweet?
    Yes! Dark chocolate will give a richer flavor.

  2. What can I use instead of heavy cream for ganache?
    You can use half-and-half or milk, but it may not be as rich.

  3. Can I freeze the cake?
    Yes, you can freeze the cake for up to 3 months. Just make sure it’s well wrapped.

Enjoy making this cake, and have a great time sharing it with family and friends!

Epic Chocolate Overload Cake

Epic Chocolate Overload Cake


Introduction

If you crave chocolate, this Epic Chocolate Overload Cake is for you! It’s soft, rich, and piled high with chocolate goodness. Perfect for birthdays, family gatherings, or just a sweet treat to enjoy after dinner.

Why Make This Recipe

You should make this cake because it is not just delicious; it’s an experience. Every bite is a chocolate explosion! Plus, it’s fun to make and decorate, and your family will love it. This cake is great for weekends when you want to impress everyone with your baking skills.

How to Make Epic Chocolate Overload Cake

Ingredients:

  • 2 cups all-purpose flour
  • 1 cup unsweetened cocoa powder
  • 2 tsp baking powder
  • 1½ tsp baking soda
  • 1½ tsp salt
  • 2 cups granulated sugar
  • 1 cup buttermilk
  • 1½ cup vegetable oil
  • 2 large eggs
  • 2 tsp vanilla extract
  • 1 cup hot coffee
  • 1½ cups heavy cream
  • 2 cups semi-sweet chocolate chips
  • Assorted chocolates (truffles, candy bars, chocolate shards)
  • Chocolate chips
  • Grated chocolate
  • Chocolate syrup or drizzle

Directions:

  1. Prepare the Cake Layers: Preheat your oven to 350°F (175°C). Grease and line three 8-inch cake pans with parchment paper. In a bowl, sift together flour, cocoa powder, baking powder, baking soda, and salt. In another bowl, whisk the sugar, buttermilk, oil, eggs, and vanilla. Gradually mix the dry ingredients into the wet ingredients, then stir in the hot coffee until smooth. Divide the batter evenly among the pans and bake for 25-30 minutes. Let the cakes cool completely.

  2. Make the Ganache: Heat the heavy cream in a saucepan over medium heat until it starts to simmer. Pour the hot cream over the chocolate chips in a bowl. Let it sit for 2-3 minutes, then whisk until smooth. Let the ganache cool slightly to thicken.

  3. Assemble the Cake: Place the first cake layer on a serving plate and spread a generous amount of ganache on top. Repeat with the second and third layers, making sure to have ganache in between each layer. Cover the entire cake with a thin crumb coat of ganache, then add a thicker layer. Smooth the sides for a clean finish.

  4. Decorate the Cake: Pour any leftover ganache on top, letting it drip down the sides. Pile assorted chocolates on top and sprinkle with chocolate chips and grated chocolate. Finish with a drizzle of chocolate syrup!

  5. Chill and Serve: Refrigerate the cake for at least 1 hour to set the ganache. Bring it to room temperature before slicing and serving. Enjoy!

How to Serve Epic Chocolate Overload Cake

Serve this cake with a scoop of vanilla ice cream on the side for an extra treat. It’s also great with a cup of coffee or milk!

How to Store Epic Chocolate Overload Cake

You can store any leftovers in the fridge for up to 3 days. Just cover the cake with plastic wrap or put it in an airtight container to keep it fresh.

Tips to Make Epic Chocolate Overload Cake

  • Make sure your ingredients are at room temperature for the best texture.
  • Don’t rush the cooling process; let the cakes cool completely before adding ganache.
  • Use high-quality chocolate for the ganache and toppings to make it even tastier!

Variation

You can add a layer of raspberry jam or chocolate mousse between the cake layers for an extra flavor twist. Try swapping some of the chocolate chips for white chocolate chips for a fun look!

FAQs

1. Can I use a different type of flour?
Yes, but all-purpose flour works best for this recipe. You can try cake flour for a lighter cake.

2. Can I make this cake ahead of time?
Absolutely! You can bake the layers a day before and assemble the cake the next day.

3. How can I make this cake gluten-free?
You can use a gluten-free flour blend instead of all-purpose flour. Just make sure it’s a 1-to-1 substitute.

Enjoy making and eating this Epic Chocolate Overload Cake!

Exit mobile version